Orthographic Sketching

Sketching is a rapid, freehand method of drawing rather drawing with instruments. Sketching is a thinking process as much as method of communication
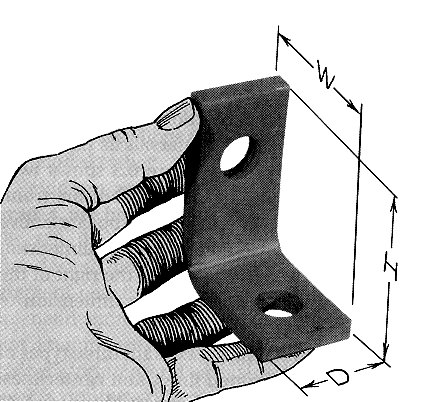
Although the angle bracket shown here is a simple 3-Dimensional object, describing it with words is difficult.

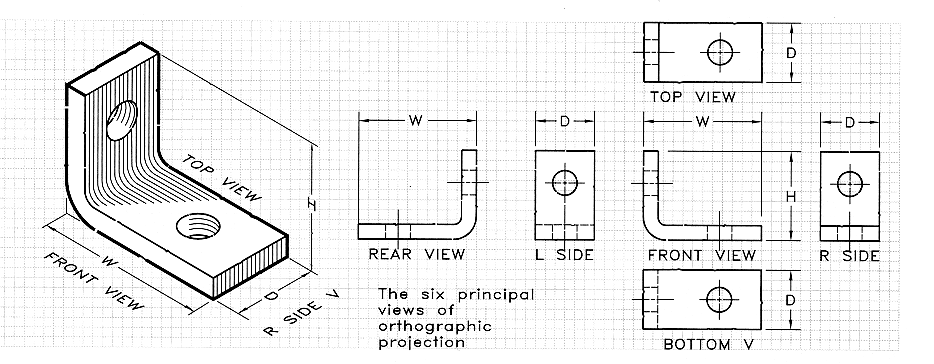
This figure shows all six of the two dimensional views of the bracket.
The top view appears above the front view because both share the
dimension of width
The side view appears to the right of the front view because they share
the dimension of height
The space between views may vary, but the views must be positioned as
shown here
This arrangement is logical, the views are easiest to interpret in this
order, since the views project from each other

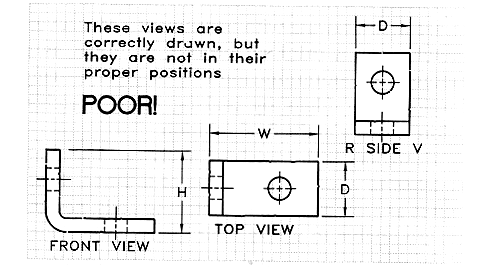
This figure illustrates the lack of clarity when views are incorrectly
positioned, even though each view is properly drawn

When sketching all lines, except construction lines, should be black and
dense.
When making a freehand sketch, lines will be vertical, horizontal,
angular, or circular
Since no tools are used in sketching, your sheet does not need to be
taped, you can position the sheet for the most comfortable strokes
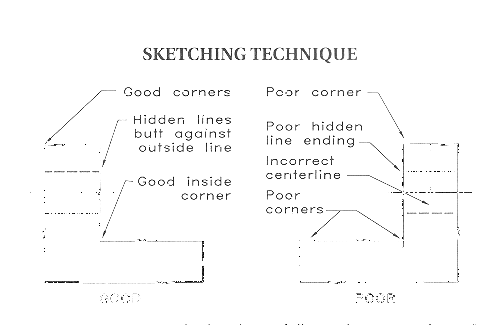
This figure shows examples of correctly sketched lines are contrasted
with incorrectly sketched ones
The maximum number of principal views that may be drawn in orthographic
projection is six
In each view, two of the three dimensions of height, width, and depth
are seen
Most objects can be adequately described with three orthographic
views
Usually the views used are the
Top
Front
Left or Right side
To obtain the views to describe an object
First sketch the overall dimensions of the object.
Then sketch the slanted surface in the top view and project it to the
other views.
Finally darken the lines, label the views and letter the overall
dimensions of height, width, and depth.
Slanted surfaces will appear as edges or fore-shortened (not true size)
planes in the principal views of orthographic projection.
When two intersecting planes of the object slope in two directions, both
appear fore-shortened in the front, top, and side views.
Scales
All engineering drawings require the use of scales measuring lengths and sizes
Scales may be flat or triangular.
The three most used types of engineering scales are:
Architects - For indoor architectural details
Engineers - For outdoor engineering (streets. land plats, etc...),
and mechanical engineering
Metric - Used for most applications where the metric system is in
use
Architects Scale
Place the scale designation in the title block or in a prominent
location on the drawing
To use the 1=1'-10 scale to measure a line
Read the nearest whole foot (2' in this case)
Then the remainder in inches from the end of the scale (3" in this
case)
For a total of 2'-3
Note that at the end of each scale, a foot is divided into inches for
use in measuring dimensions less than a foot.
The scale 1" = 1'-0 is the same as saying that 1 in. is equal to 12
in.
Or that the drawing is 1/12 the actual size of the object
Engineers Scale
On the engineers scale each inch is divided into multiples of 10
Each end of the scale is labeled 10, 20, 30, etc. which indicates the
number of units per inch on the scale
Many combinations may be obtained simply by mentally moving the decimal
places of a scale
To use of the 10 scale to measure a line 32.0 ft long drawn at the scale
of 1=10'
And the 20 scale to measure a line 540.0 ft long drawn at the scale of
1=200'
|